Loading...
1. Introduction

In the new version of BPM4Net, the new activity Task is added into the process activities. The Task activity is added to handle human tasks which are typically long running activities in the process. This makes it hard for both developers and business users to test and validate the system. In the new version 2.0, BPM4Net has added a set of libraries to extend the workflow persistence store and workflow control endpoint. The extensions make the implementation and integration a lot easier when dealing with the Task activity. The Task Control Panel utilizes these interfaces to retrieve the tasks in the different persistence stores and submit it back to the process.

The following image, Figure 1, shows the overall structure of the whole solution. It is placed here to facilitate the understanding of the project from a flow perspective.

After the Panel is launched, change the Endpoint settings if it’s different from the configuration of your settings to make it communicate to both the Process Service and the WCF Service. Click the two Browse buttons to validate the two services required by the Task Control Panel are all up and running. The User Interface should look similar to that in Figure 2 below:

The three buttons located at left bottom corner can be used to retrieve a list of tasks from persistence store. Tasks can be retrieved with criteria such assigned groups, assigned user or due date. In the world of windows workflow, each instance has an instance id. This will be listed in the list on the top left. Instances with no tasks awaiting human interaction will not be listed. One instance can have one or more tasks at runtime depends on the design of the process flow. i.e. Using Split and Join from BPM can potentially have more than one tasks idled in the persistence store. The tasks of the selected instance are listed next to the instance list. Any of the tasks can be clicked on to make further operations. These are, assign a task to a user or a group, change the due date of the task, and change the content of the task for submission. There are three modes supported by the tool:

  • Memory – MemoryWorkflowInstanceStoreBehavior has to be configured in the process service
  • Sql – SqlBusinessProcessInstanceStoreBehavior has to be configured in the process service
  • OptimizedSql - SqlBusinessProcessInstanceStoreBehavior has to be configured in the process service. Additional Sql Scripts from the BPM4Net product have to be executed on the Workflow Instance Store database. (* this mode is only available and supported under the commercial license)


2. Tutorial

Building a Business Process Application with BPM4Net utilising the Task Control Panel

We’ll be using the BPM4Net Task Control Panel to build a simple WCF Workflow Service Application, along with WCF Services for consuming the task repository to retrieve and process the tasks in a flow.


3. Step 1: Create a WCF Workflow Service project

In this step, we’ll add a WCF Workflow Service to our solution, let’s call it ProcessService. In this project, there should be a Service1.xamlx existing by default. Open this file and start dragging and dropping BPM controls to it. Our final workflow should look like the following:

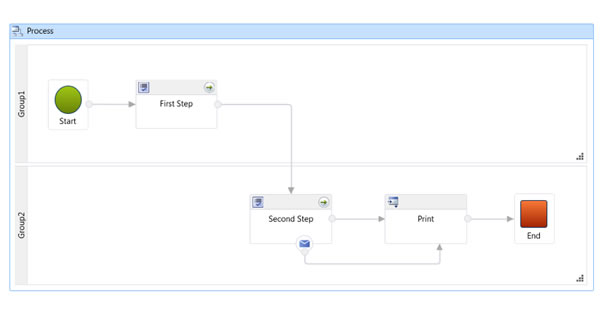
As can be seen in Figure 2, our process activity contains two swimlanes and each Swimlane has a Task Activity in it. When the first Task Activity, ‘First Step’ in the Swimlane ‘Group1’ finishes, it triggers the second Task Activity, ‘Second Step’ in the Swimlane ‘Group2’, which in turn kicks off the print activity when done. There is a trigger sitting on the Second Step expecting a WCF message to move to the Print step as well.

If we double-click on any of two Task Activit, we should be able to see the detailed information of the task.

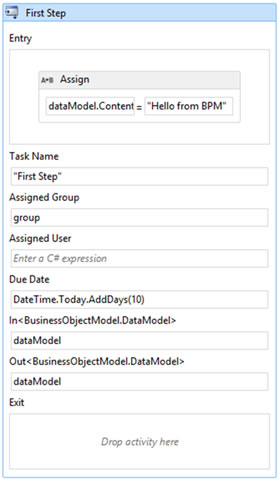
If you have used BPM4Net before, Figure 3 should be self-explanatory. The ‘Task Name’, ‘Assigned Group’, input argument (In<object>), output argument (Out<object>), etc… are variables you can define. These variables will be stored in the persistence store once the task has been created and they can be retrieved easily by using the Task APIs provide by BPM4Net.

Let’s move on to the next step, in which I will show you how to configure our workflow service to make it available to be consumed.


4. Step 2: Set-up the web.config for the WCF Workflow Service

Next is to configure the newly created service. Firstly, check to see if the BPM.NET.Activities.ServiceModel.dll is referenced by the Workflow Service. This Dll is required to configure the endpoint. Once this Dll has been referenced then add the behaviour and endpoint Extensions inside the service model section, this makes the services understandable by the WCF framework. The code should look similar to the configuration below:

The rest of the configuration should be as simple as configuring a normal WCF service. In this project, we are using ‘basicHttpBinding’ and our service name is ‘Service1’. The service configuration should look similar to the configuration below:

If you are using SQL Server for the persistence store, a ‘connectionString’ can be added inside the behaviour section to connect to the required SQL Server, e.g.

At this point, we should be able to perform operations to our task control by using IBusinessProcessControl in BPM service model.

However, you may notice that we haven’t got APIs such as get the content of the Task object, in the next step. I will show how to set up configuration to make them available.


5. Step 3: Consume task repository

In order to consume task repository, we need to add a few configurations into the web.config file. In this sample, I will add those configurations into our ProcessService project.

The technique that we use here is a WCF 4.0 feature called File-less Activation, which means we don’t need any svc files to make our WCF API available.( more information, please see this link )

The configuration should look like the image below:

If Sql or OptimizedSql is going to be used on the WCF client, the BusinessProcess ConfigSection is required as below:

All the available APIs look like the image below:

That’s it, from now on. We have all the APIs ready. Let’s use the Task Control Panel to test the process.


6. Step 4: Consume Workflow service in Task Control Panel

To use the Task Control Panel only, this section can be skipped. In this section we are going to briefly show how the Task Control Panel was built to consume all the services and APIs provided by BPM4Net product.

The Task Control Panel is created in WPF application to consume the Process Service. The following Dlls are referenced in the WPF project.

  • BPM.NET.Activities.ServiceModel.dll
  • BPM.NET.Activities.Persistence.dll

Here are some main codes used in the Task Control Panel in Figure below. The IBusinessProcessControl interface in the BPM.NET.Activities.ServiceModel.dll provides a way to start the workflow process. The service configuration has to be passed to a generic ChannelFactory class, and then it should be right to go.

Once the content of the task is ready for submission, click the submit task button on the right. Behind the scene, the submit task will use the API that is provided by the IBusinessProcessControl interface to submit the task.

In this process, WCF Test Client tool can also be used in order to send WCF messages to the Receive Activity which is listening at URL: http://localhost:2140/Service1.xamlx.


7. Summary

It has been demonstrated how to submit and start a process by using the IBusinessProcessControl interface, and it has been explained how to retrieve the tasks with different criteria using ITaskRepository interface. The Task Control Panel is provided as a tool to help the developers and business users to quickly build and test the process.

Find the resources of this sample below: